The radiator started up with its usual metallic ticking sound that normally meant warmth was coming. Outside the wind moved through empty branches and shook the window frames like a quiet signal that colder weather was ahead. Inside the air was warm enough but it felt thin and dry. Your throat felt scratchy & your skin felt tight on your hands while your nose seemed ready to sneeze at any moment. Then you remembered something you heard before from maybe an older family member or somewhere online about putting a glass of water near the radiator to make the room feel better. You look toward the kitchen and think about how strange it seems that an ordinary glass of water could actually help with the dryness. It sounds like some kind of old myth or superstition. But as the evening goes on and the air gets even drier you fill a glass completely & carry it back to set it down next to the radiator. As the water slowly heats up something small begins to change. It happens in a quiet way that you can barely notice at first but winter always reveals its secrets like this.

The Quiet Science Inside an Ordinary Glass of Water
At first thought, the idea that a simple glass of water can make a room feel warmer—without raising heating costs—sounds misleading. Water does not create heat, nor does it act as a hidden heater on a windowsill. The explanation is more refined. Rather than generating warmth, the water helps your body perceive existing heat more efficiently. The comfort comes from how moisture in the air interacts with your skin and breathing, subtly shifting how warmth is experienced indoors.
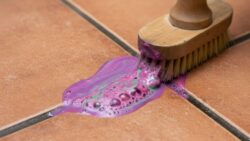
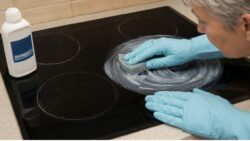
 Remove Scratches From Glass Cooktops at Home Using Smart Techniques That Avoid Replacement
Why Low Humidity Makes Heated Rooms Feel Chilly
Your body is constantly balancing heat with its surroundings. In dry indoor air, moisture evaporates quickly from your skin and through each breath you release. This evaporation pulls heat away from your body, creating a mild cooling sensation—even when the room temperature appears adequate. The heater may be working as intended, but your body senses something different.
Placing a glass of water near a heat source allows it to absorb warmth and release small amounts of moisture into the air through slow evaporation. Even a slight rise in humidity can reduce moisture loss from skin and lungs. The temperature stays the same, yet the space feels gentler and warmer, making the environment noticeably more comfortable.
 Facial Balance Tip: Why Incorrect Blush Placement Near the Nose Disrupts Overall Face Harmony
Aloe Vera: A Soft and Supportive Base
For centuries, aloe vera has been valued for its calming effect on skin, long before it became a packaged cosmetic staple. Pure aloe gel feels cool, lightweight, and smooth—never stiff or tacky. When used on eyebrows, it acts as a subtle styling aid, providing structure without harshness.
In a homemade brow gel, aloe serves as the core ingredient. Its natural consistency offers light to medium hold, helping brow hairs stay in place while remaining flexible. When sourced with minimal additives, aloe also delivers gentle hydration with each application, turning a simple grooming step into a moment of care.
Cocoa Powder: Natural Depth and Warm Pigment
Cocoa powder adds warmth and rich, earthy color. Its brown pigment works well for brows, particularly for light to medium-dark tones. When blended with aloe, cocoa creates a soft, diffused tint instead of a bold, painted look.
The strength of this ingredient lies in adjustability. A small amount provides subtle definition, while adding more deepens the shade. The result blends naturally with brow hairs and avoids sharp edges. There is a quiet satisfaction in using the same ingredient found in the kitchen to softly frame the face.
Assembling Your Simple Mixing Setup
Preparing your own brow gel feels calm and intentional rather than technical. Clean containers, a small spoon, and a spoolie brush are all you need. Each tool has a role, and the process remains unhurried and hands-on.
 At-Home Eyebrow Tinting Made Simple With an Easy Step-by-Step Process for Soft Defined Brows
The basic formula requires only aloe vera gel and cocoa powder. Optional additions—such as a drop of jojoba oil for smoothness or small amounts of coffee or charcoal for deeper tones—can be added later. The beauty of this recipe lies in its simplicity, relying on just two thoughtfully combined ingredients.
| Item | Role & Use |
|---|---|
| 2 teaspoons pure aloe vera gel (clear, unscented) | Acts as the main base, providing natural hold, smooth application, and moisture |
| ¼–½ teaspoon unsweetened cocoa powder | Adds a soft, natural tint to enhance brow color |
| Small clean glass jar or lidded container | Used to safely store the prepared mixture |
| Clean spoolie or angled eyebrow brush | Helps apply and shape the product evenly on brows |
| Mini spoon or mixing stick | Used to combine and blend all ingredients smoothly |
Blending the Gel: Simple Steps, Smooth Results
Add about two teaspoons of aloe vera gel to a clean jar. Sprinkle in roughly a quarter teaspoon of cocoa powder, then stir slowly, pressing out any lumps. The clear gel gradually shifts into a smooth, natural brown.
Test the shade on the back of your hand and allow it to dry briefly. Adjust as needed by adding more cocoa for depth or more aloe for softness. The final texture should be creamy and easy to spread, yet thick enough to coat a brush evenly. Once mixed, seal the jar and let it rest for an hour so the color settles evenly.
Applying the Gel with Precision and Patience
This homemade gel encourages a measured approach. Begin with clean, dry brows. Dip a spoolie lightly into the jar, removing excess product. Brush through the brows using short, gentle strokes that follow the natural hair direction.
Start at the inner brow and move outward, shaping rather than drawing. For added definition, allow the first layer to dry before applying another, focusing on sparse areas. An angled brush can help create hair-like strokes when needed. The finish stays soft, flexible, and natural, never stiff or heavy.
Simplicity, Skin Awareness, and Thoughtful Choices
Making a product at home carries quiet significance. It reduces waste, limits unnecessary ingredients, and reconnects you with the act of creating something yourself. Each refill replaces another disposable tube, and each use reinforces that beauty routines can be straightforward.
Natural approaches are personal, and listening to your skin is essential. Patch testing remains important, and adjustments are part of the process. Still, there is value in slowing down, mixing by hand, and shaping brows with intention. In that small ritual, beauty becomes gentle, practical, and personal, often beginning with the simplest elements.